Pages

Tuesday, January 29, 2013

Decorating with Blue

Guys, I have a problem.  I cannot decorate a room without incorporating the color blue in it.  It just seems to come naturally and I can't get enough of the color.

image source unknown

image source unknown


Whether its a splash of the color or a strong statement, I just love the color blue in my home.  Any shade will do for me.


I love punches of teal, dashes of navy, anything blue really.  Also, I stinkin' love the look of these wingback chairs + the pillow below...


Do you guys have a certain color your drawn to?  Have you noticed a predominant color in your home?  Mine is red.  Just kidding.  

Monday, January 28, 2013

DIY Gold Elephant

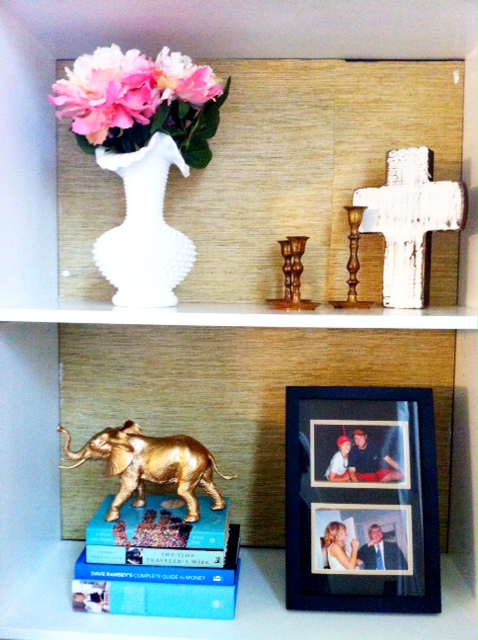
Happy Monday!  These metallic toy animals have been making their way around the blogosphere and I couldn't pass up making one for our bookcase when I saw this gray toy elephant (Roll Tide!) in the checkout aisle at Joann's...


It seemed like an easy project (and it is!), so I scooped up my supplies and went to town!

Here's what you'll need:


  • 1 plastic toy animal
  • white primer spray paint
  • metallic gold spray paint
  • clear acrylic sealer


Instructions:

Begin by priming the toy on all sides.  I found it best to put the toy on its back and spray with primer.  Then once that has dried, turn the toy on one side, then the other and finally place it in the standing position making sure that it is dry in between movements.  Once you have done one coat of primer, repeat the previous steps with a second coat of primer.

Repeat the application process with the gold spray paint, doing two coats.

Repeat the application process with the clear acrylic sealer, doing just one coat.  Let it dry completely and you're done!


I'm sure this sweet little elephant will enjoy moving around the house every month when I compulsively redecorate.  He looks like the type that likes to travel.


Here's to hoping this week isn't as hectic as last week!

Friday, January 25, 2013

happy friday


Just some lovely words for some lovely readers.  Happy Friday, y'all!

image source unknown

Thursday, January 24, 2013

Before + After: Gossip Bench


As a wedding gift, my grandmother gave us this antique gossip bench she got at an antique auction near their South Georgia home.  I love the color of the wood and how unique this piece is - and not to mention how I will always think of my grandmother when I look at it.  The only thing that needed a little updating was the fabric on the seat.  It was a weird faux leather with a floral pattern.


This was an easy fix and a quick update!  I picked up some fabric from Joann's (that I was originally going to use on our dining room chairs - more on that later...) and went to work.  This is how the little darling looks now...


It's the perfect addition to this little corner in our house.  I'm sure I'll change up the fabric again at some point, but for now I'm really liking this pop of red ikat!  Here is a closer look at the fabric...


Recovering the seat of a chair or ottoman is an easy way to bring new life to a piece of furniture and it's cheap!
The DIY bug must have bit me this weekend because I did a few more projects around the house and can't wait to share them with y'all!  Have you guys been up to any fun DIY's?

Monday, December 17, 2012

Recipe: Sausage Stars


Not only are these sausage stars easy, they are insanely addicting! I had blogged about them before (a long, long time ago), but thought they were worth another blog post.  Yes, they are that good.  Yes, you will gain 5 lbs. from eating an entire pan of them.  And yes, you can thank me (or yell at me) later  :)


Sausage Stars


Ingredients:

1 pound sausage, cooked and crumbled
1 1/2 cups grated cheddar cheese (do not use pre-shredded)
1 1/2 cups grated Monterrey jack cheese (do not use pre-shredded)
1 cup prepared ranch dressing mix (make sure to use the dry ranch packet)

1 can (2.25 oz) sliced olives
1/2 cup chopped red pepper
1 package fresh or frozen won ton wrappers
Vegetable oil

Instructions:

Pre-heat oven to 350 degrees F.

After cooking the sausage, blot it dry with a paper towel.  In a large bowl, combine sausage with cheeses, prepared ranch dressing, olives and red peppers.  Set aside.


Lightly grease a mini or regular muffin tin and press one won ton wrapper in each cup.  Brush won ton wrappers lightly with vegetable oil.  
Bake for 5 minutes.  Remove from oven.

Fill won ton wrappers with sausage mixture.  Bake 5 minutes or until bubbly.  Makes 4 to 5 dozen.

Bon appetit!


Tuesday, December 11, 2012

DIY Wooden Name Sign


A few weeks ago I decided to paint a sign for our foyer to give it a more personal touch.  A few years ago I made a sign for my sweet friend Miranda, but never got around to making one for myself!  So, a lazy Saturday presented itself and I drug out the paint and went to town.

Here is what you will need:

  • Piece of wood or an old sign you want to repaint
  • 2 color of acrylic paint (or any paint will do)
  • Paint brushes
  • Computer and printer
  • Ball point pen
  • Wood stain (optional - I didn't use it on this piece)

Let's get started...

Sand the piece of wood and dust off sanded remnants.  Paint the wood a solid color.  I used a premixed gray acrylic paint I found at Hobby Lobby.  You may need to do two coats depending on your paint color.  Let it dry completely.

While the paint is drying, print out the letters needed in the font you'd like on your computer.  Place them on the wood where you'd like the wording and trace the outline with a ballpoint pen, pressing down a bit to make an imprint on the wood.

Paint the traced letters with your second paint color.  You may need to do two coats (I did!).  Let that dry and then enjoy your finished work!  If you want a more antique look, try using a wood stain on top of the completely dry paint (I've used Minwax Provincial 211 in the past).  Wipe the stain on, let it sit for a few minutes and then wipe it off.  Ta-da!


This would be a great gift for a friend or newly married couple!  Simple and heartfelt  :)  Hope everyone is having a wonderful week!

Thursday, August 16, 2012

Apple Brie Panini Recipe


I'm just going to go ahead and let you in on a little secret.  This sandwich is life changing.  Really.  This sandwich will make you a better person.  More in tune with God.  With yourself.  With others.  So, I don't think it comes as any shock that I'm going to need you to make this sandwich.  Amen.

Really, though, this sandwich was so simple.  Just 5 ingredients (6 if you count sea salt, but let's not get all technical here).  I found the initial recipe here and just adapted it to my own taste a bit.  So, on with the recipe....


Apple Brie Panini


Baguette or Hoagie roll (sourdough would taste great!)
Brie (enough to cover one layer on the sandwich, 2 - 3 oz.), cut in slices
1 granny smith apple, cut in slices
handful of arugula
2 tablespoons of honey (I suggest clover or orange blossom honey)
sprinkle of coarse sea salt

Take your baguette or hoagie and slice it in half (long ways).  Spread the inside of both sides of the bread with honey.  On the bottom bread slice, place the sliced brie and sprinkle with coarse sea salt.  Then, add a layer of the sliced apples, top with arugula and add more honey to your taste. Place the top bread slice on top.  Grill on a panini press or George Forman grill, making sure to grease it first.  Grill 3 - 6 minutes, or until cheese is melted and bread is crispy.  Bon appetit!

Note: You can also try it without grilling.  It's delicious, too!  But that melty brie cheese just seems to warm the soul :)